
DeepVideo Video Translation · User Guide
From uploading a video to getting your translated final cut — everything you need to know in one guide
Contents
- Quick Start in 5 Minutes
- Choosing Among the Four Project Types
- Creating a Project: What Each Option Means
- Voice Settings: The Three Voice Modes
- What Happens During Processing
- Editing Subtitles
- Generating the Final Video & Output Location
- FAQ & Troubleshooting
- Practical Tips
- Keyboard Shortcuts
- Further Reading & Links
1. Quick Start in 5 Minutes
Just want to translate one video into another language? Take the shortest path — Quick Translation:
Click “Quick Translation” in the sidebar → “+ New Project”
Click “Browse” to select the video file you want to translate (supports mp4 / mkv / avi / mov / webm / flv).
Pick the source and target languages
Not sure about the source language? Leave it on “Auto Detect”. The target language defaults to English — change it as needed.
Keep the default settings and click “Create Project”
The default configuration (Fast recognition + Fast TTS + Voice Clone) works well for most videos with clear human speech.
Confirm your quota and wait for processing to finish
A dialog shows the video duration and the quota to be deducted. Click “Confirm” and processing starts automatically — you can watch progress in real time.
Review the subtitles in the editor, then click “Generate Video”
When translation finishes you’ll be taken straight to the editor. Review the translated lines (edit any of them), then click “Generate Video” in the top-right corner to get your final cut.
2. Choosing Among the Four Project Types
| What I want to do | Choose this | Why |
|---|---|---|
| Translate a video into another language, as fast as possible | Quick Translation | Minimal setup — default parameters work out of the box |
| Control translation style, terminology, multiple speakers, or emotion | Pro Translation | All advanced options live here (see section 3.4) |
| Keep the original voice, just burn the recognized subtitles into the picture | Video Subtitles | No TTS dubbing — fastest and most quota-friendly |
| A multi-speaker conversation where each speaker should get a different voice | Video Dubbing | A two-stage pipeline designed specifically for multiple speakers |
3. Creating a Project: What Each Option Means
Language Settings
- Source language: If unsure, leave it on “Auto Detect”. But if you know the video’s language, setting it manually is more accurate and faster.
- Target language: Only available in Quick/Pro Translation. “Video Subtitles” and “Video Dubbing” don’t change the language, so they have no target language option.
Speech Recognition Quality (determines subtitle accuracy)
| Option | Best for |
|---|---|
| Fast (default) | Videos with clear audio and normal speech pace — the right choice most of the time |
| Standard | Slight accents or background noise; balances speed and accuracy |
| Pro | Noisy environments, heavy accents, lots of technical terms — most accurate but slowest |
Text-to-Speech Quality (determines how the dubbing sounds)
| Option | Description |
|---|---|
| Fast (default) | Local model, quick processing, good enough for everyday use |
| Premium | A more natural local model, supports 16 languages — recommended for published content |
| Pro | Cloud TTS, highest quality; Chinese/English only, requires one of our pricing plans, ⚡ surcharge applies |
Advanced Options (Pro Translation only)
Available after enabling “Enhanced Translation“:
- Translation style: Formal / Conversational / Literary / Technical / Kid-friendly, etc. — match the tone of your video.
- Industry domain: Medical, legal, finance, gaming, etc. — the AI uses industry-specific wording.
- Custom instructions: e.g. “Keep names in English”, “Avoid honorifics” — just write them in plain language.
- Glossary: Fixed translations for brand names, product names, etc. Set it once and it applies to the whole project.
Subtitle Settings
- Translation projects: Subtitles are not burned in by default. If needed, enable “Add Subtitles” and choose language (source / translated / bilingual), size, background, font, and position. For bilingual subtitles you can also choose whether the translation goes above or below the original.
- Subtitle/Dubbing projects: Subtitle styling is always adjustable; AI Subtitle Correction is on by default and uses AI to fix recognition typos — we recommend keeping it.
- Remove Original Subtitles (experimental): Burned-in subtitles already in the picture? Enable this and the AI will detect and erase them automatically. ⚠️ Very CPU-intensive — one minute of video may take several minutes to process. Use with caution on long videos.
4. Voice Settings: The Three Voice Modes
| Mode | Effect | Best for |
|---|---|---|
| Voice Clone (default) | Clones the original speaker’s voice | You want “the same person speaking” — most translation scenarios |
| Built-in Voices | Pick from the system voice library | You don’t want the original voice, or its quality is too poor. Click “Browse Voices…” to audition |
| Custom Voices | Use voices you created earlier | Reusable brand voice / host voice across multiple projects |
- Always audition before creating: Every voice mode has a “Preview Audio” button. Listen first — much cheaper than redoing the final video.
- Vocal separation is on by default: Background music is separated out before dubbing, so the final video keeps the original music. Forced on automatically when Voice Clone is selected.
- Multi-speaker mode (Beta): When enabled, each speaker gets a different voice. Note: only “Voice Clone” or “Auto Select” works in this mode.
- Speech volume (Pro Translation / Dubbing): a −50% to +50% slider that adjusts voice only — background music is untouched.
5. What Happens During Processing
Reading the Progress Page
- Big progress bar at the top: Overall completion percentage — only ever goes up.
- Step-card timeline: Each step shows its status in real time —
Status Meaning Gray dot Waiting to start Pulsing dot + mini progress bar Processing (e.g. “Translating 3/20…”) Green ✓ Completed Red + Retry button Failed — click “Retry” to resume from that step; finished steps are preserved Orange Cancelled - The taskbar moves too: The Windows taskbar / macOS Dock icon mirrors the progress, so you can glance at it while doing something else.
Helpful Automatic Behaviors
- Resume from checkpoint: If the app restarts unexpectedly, processing continues from the last completed step — no starting over.
- Stall warning: If there’s no progress update for 5 minutes, a warning appears — check your network first, then restart the app and retry if needed. New releases may already include a fix — check the Release Notes.
- Auto-jump on completion: 1.5 seconds after processing finishes (or reaches the translation pause point), the subtitle editor opens automatically.
- Cancellable anytime: “Cancel Pipeline” in the top-right corner works at any time; a cancelled project can be retried later.
6. Editing Subtitles
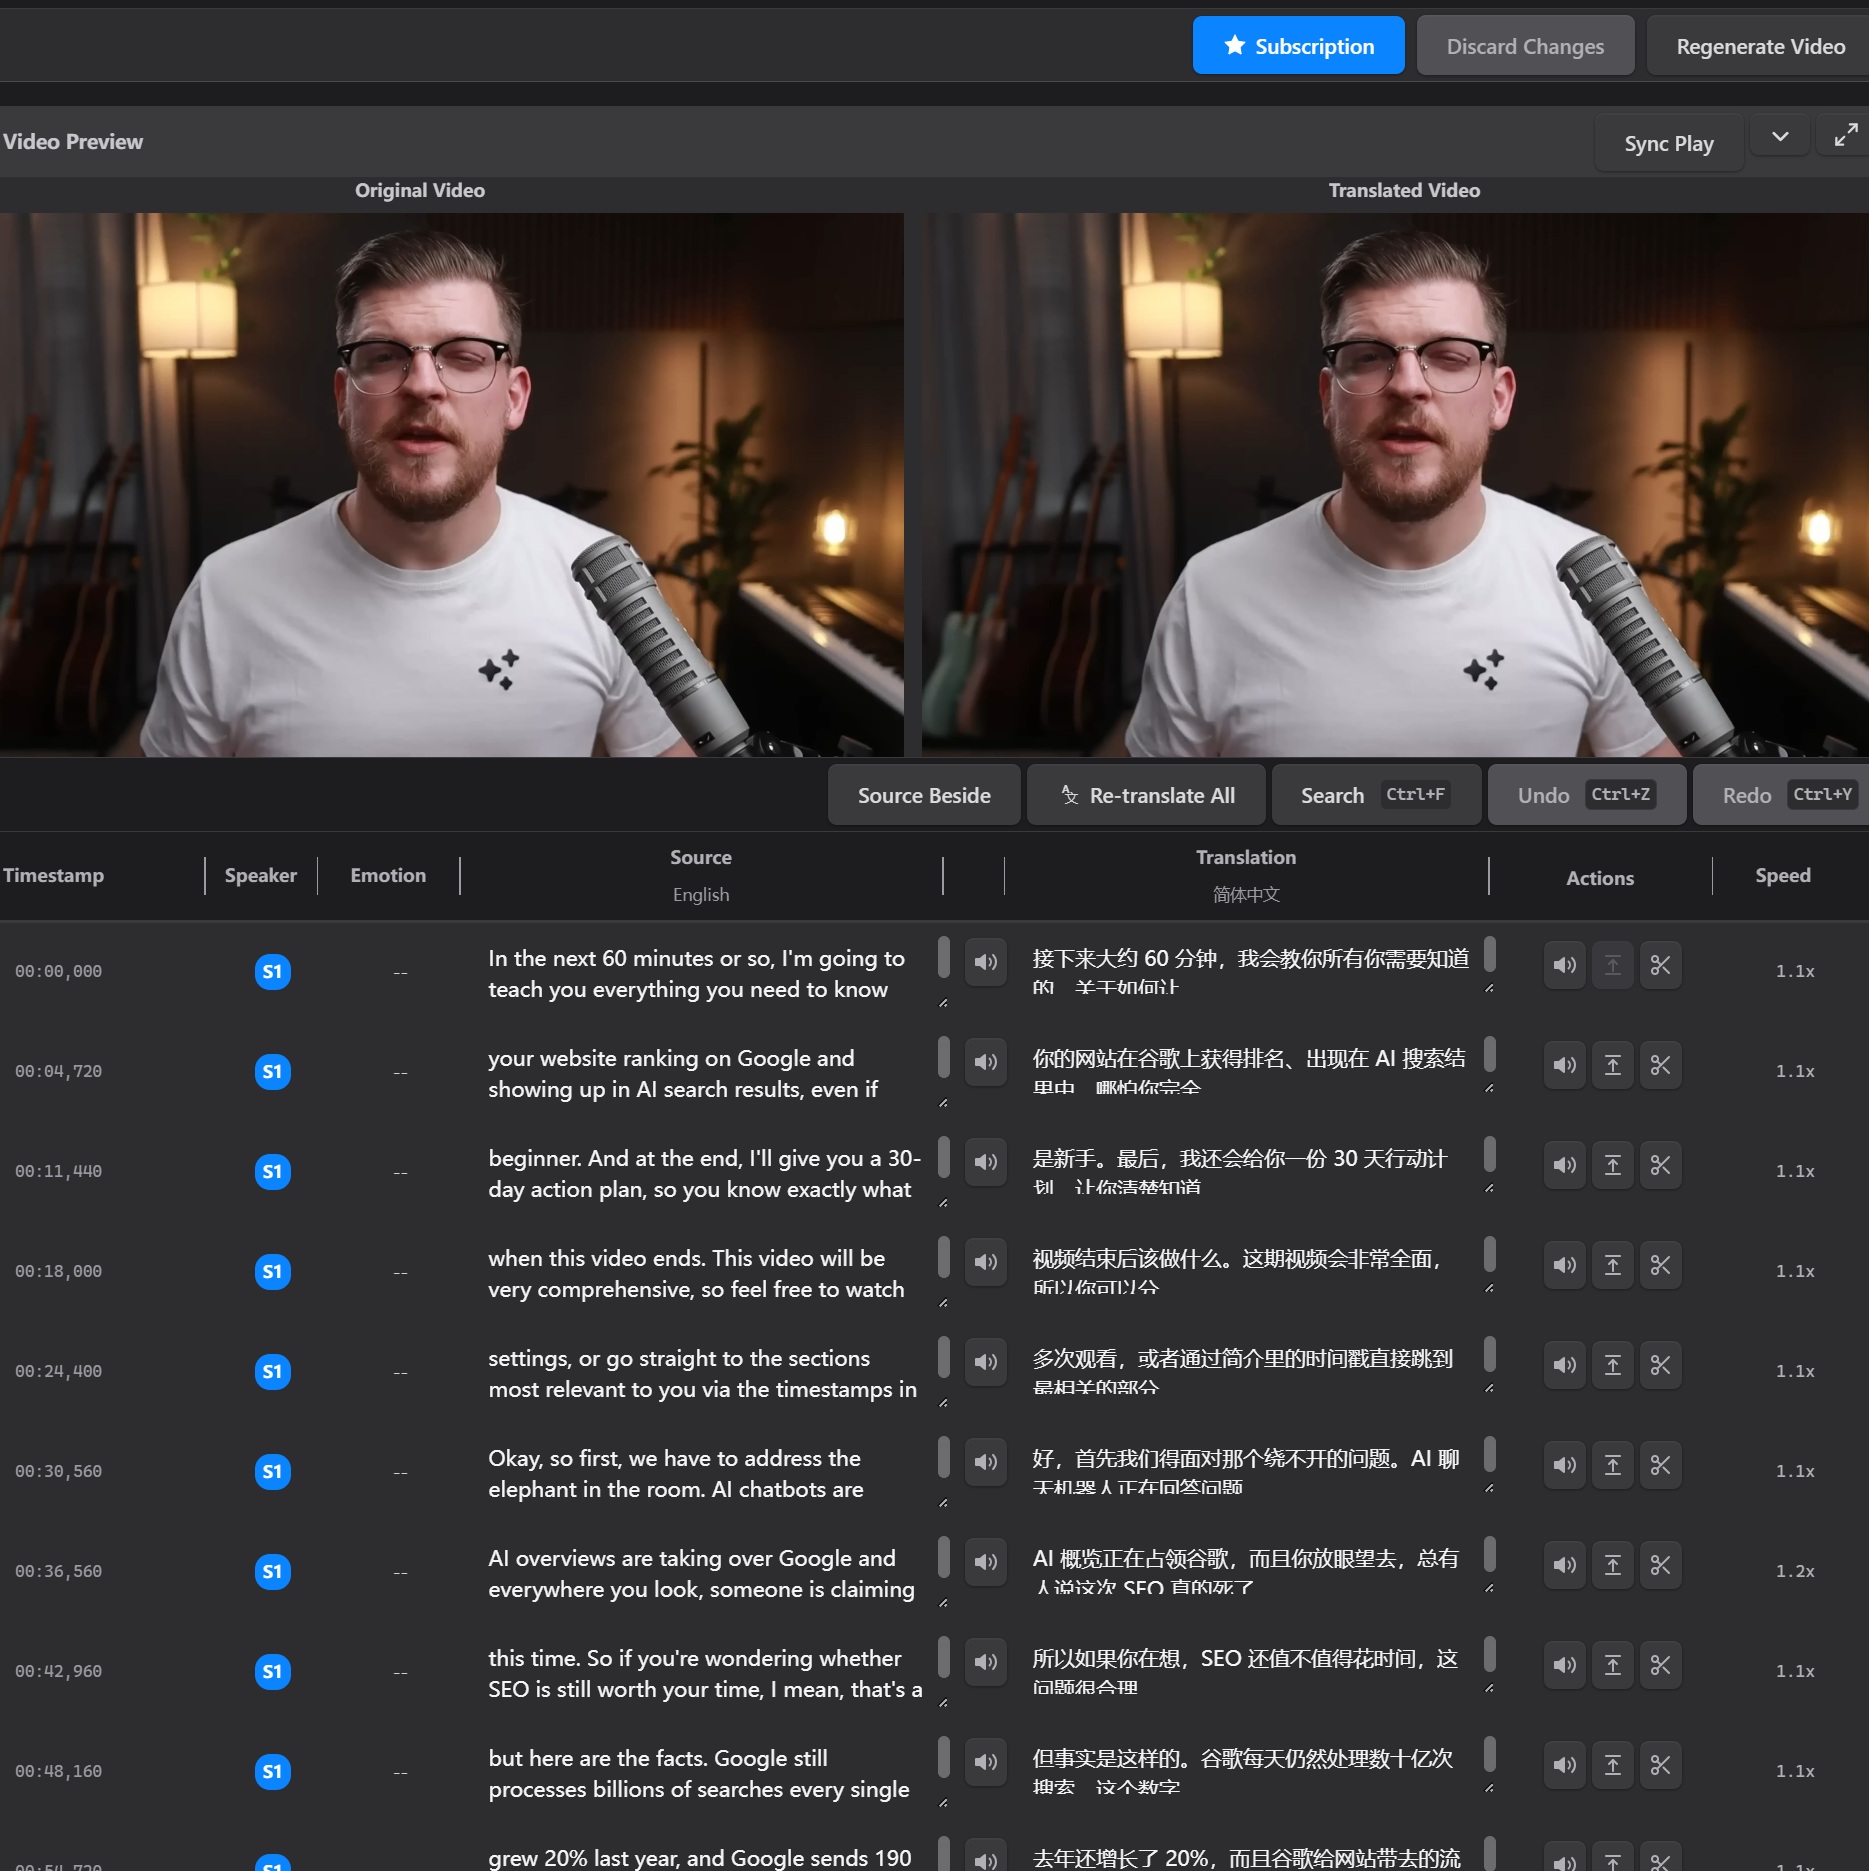
After processing completes (or reaches the pause point) you enter the editor — the final quality gate before generating the video. Common operations:
| I want to… | How |
|---|---|
| Fix a translated line | Click directly in that row’s “Translation” cell to edit inline |
| Listen to the original audio | Click that row’s ▶ play button |
| Re-dub just one line | Click that row’s ↺ Regenerate — only that segment’s TTS is rerun |
| Adjust speaking speed of a line | Edit the “Speed” column (e.g. 1.2x) |
| Redo the whole translation | Click “Re-translate All” to retranslate everything with current settings |
| Use my own subtitle file | Click “Import SRT” to replace the generated subtitles |
| Undo a mistake | Ctrl+Z (up to 50 levels); or “Discard Changes” to roll everything back |
| Find a specific line | Ctrl+F to search all subtitles |
- Side-by-side preview: The original and translated videos play side by side. Click “Sync Play” to watch both at once; or “Pop Out” and drag it to a second monitor.
- Change settings without rebuilding the project: The left panel lets you change language, model, voice, subtitle styling, etc. Everything takes effect when you click “Generate Video”.
- Leave-page protection: Leaving with unsaved edits triggers a confirmation dialog — no accidental loss of work.
7. Generating the Final Video & Output Location
- Review/edit the subtitles → click “Generate Video” at the top.
- If settings changed (e.g. upgraded TTS), a prorated billing confirmation appears — confirm to continue.
- The pipeline starts from dubbing synthesis (or subtitle burning). When it finishes you’re returned to the editor, where the final video is ready to play.
Where to find it: video/target.mp4 inside the project directory. You can also click “📂 Open Folder” on the project card to jump straight there.
Curious what others have made with DeepVideo? Browse the Works showcase.
8. FAQ & Troubleshooting
9. Practical Tips
Test-run with a short clip
Validate any new combination of settings (model, voice, style) on a 1–2 minute sample before committing to a long video.
Always preview voices
Click “Preview Audio” before creating the project — far cheaper than reworking the finished video.
Build a glossary for key terms
Put brand names, personal names, and product terms in the glossary for consistent, on-target translations reused across projects.
Use auto-detect for multi-speaker first
Not sure how many people speak? Choose “Auto Detect”, then manually specify 2–5 speakers if the detection is wrong.
Keep “Pause After Translation” on
Reviewing subtitles before generation is the cheapest time to catch mistakes — fixing them after dubbing costs another round of quota.
Hover a project card to see its config
Hovering a project card for 600ms shows the full configuration — handy when asking “what settings did this project use?”
Why is DeepVideo so affordable?
Local processing keeps costs down — read why we’re so much cheaper than competitors.
10. Keyboard Shortcuts
| Shortcut | Action |
|---|---|
| Ctrl+F | Search in the subtitle editor |
| Ctrl+Z | Undo (up to 50 levels) |
| Ctrl+Y | Redo |
11. Further Reading & Links
About DeepForgeHub · Privacy Policy — videos are processed 100% locally, never uploaded to the cloud
DeepVideo User Guide · September 2026 Edition